
Small Kitchen Remodel: Your kitchen’s the size of a closet, and you’re pretty sure your cutting board takes up half the counter space. Sound familiar? You’re not alone – millions of us are wrestling with tiny kitchens that make cooking feel like a game of Tetris. But here’s the thing: small doesn’t mean you’re stuck with cramped and chaotic. A smart remodel can transform your shoebox kitchen into a space that feels open, organized, and dare I say it, Instagram-worthy. Ready to make your little kitchen work harder than it ever has? Let’s turn that tight space into something you’ll actually love spending time in.
1. Paint Your Cabinets White (Or Any Light Color)
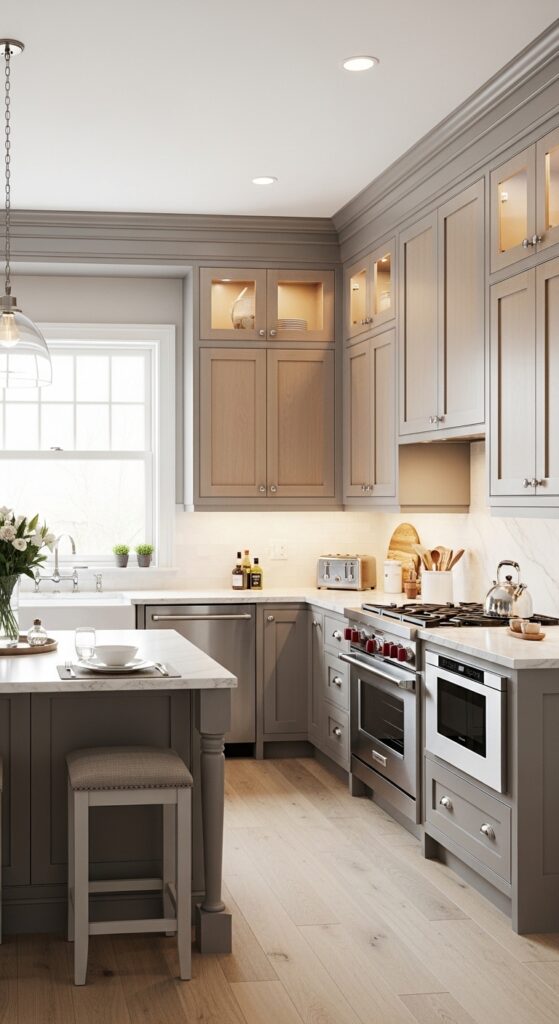
Small Kitchen Remodel: Dark cabinets eat up visual space like nobody’s business, making your already-small kitchen feel like a cave. You grab a paintbrush and some quality cabinet paint, and suddenly those heavy wood tones disappear. Light colors reflect natural light instead of absorbing it, which tricks your eye into thinking the room’s bigger than it actually is. White’s the classic choice, but soft grays, pale blues, or even mint green work magic too. The transformation takes a weekend and costs less than buying new cabinets – we’re talking hundreds instead of thousands. Your kitchen won’t physically grow, but it’ll breathe easier. And breathing room’s exactly what you need when you’re working in tight quarters.
Prep work matters more than you think: You sand down the existing finish, clean every surface with degreaser, prime with a bonding primer, and then apply two thin coats of your chosen color – rushing this process guarantees you’ll hate the results in six months when the paint starts chipping.
Hardware updates seal the deal: You swap out those dated brass pulls for sleek matte black or brushed nickel handles, and suddenly your freshly painted cabinets look like they cost ten times what you actually spent – it’s the jewelry that completes the outfit.
READ MORE: 21 Genius Shoe Storage Ideas for Every Home
2. Install Open Shelving Instead Of Upper Cabinets
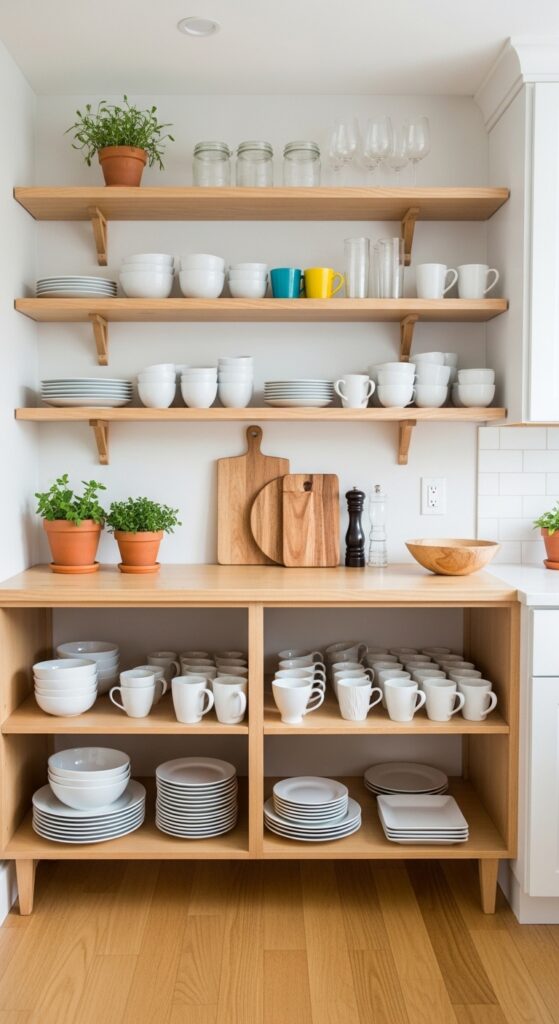
Upper cabinets close in a small kitchen faster than anything else in the room. You rip down a section (or all of them if you’re feeling brave) and mount floating shelves in their place. Suddenly, your walls recede instead of pressing in on you. Open shelving forces you to edit your dish collection down to the essentials, which means less clutter automatically. You display your pretty bowls and favorite mugs, and they become part of your decor instead of hiding behind closed doors. The cost? A fraction of new cabinetry. The catch? You need to keep those shelves styled and tidy because everyone sees everything now.
Strategic placement keeps it functional: You install shelves where you actually grab things daily – near the sink for glasses and everyday dishes, by the stove for oils and spices – because pretty shelves that make you walk across the kitchen seventeen times while cooking defeat the whole purpose.
Mix it with closed storage: You keep lower cabinets for the ugly stuff like mismatched Tupperware and that waffle maker you use twice a year, creating a balance between airy openness and practical concealment that actually works in real life.
READ MORE: 12 Valentine’s Decor Ideas That Feel Romantic 2026
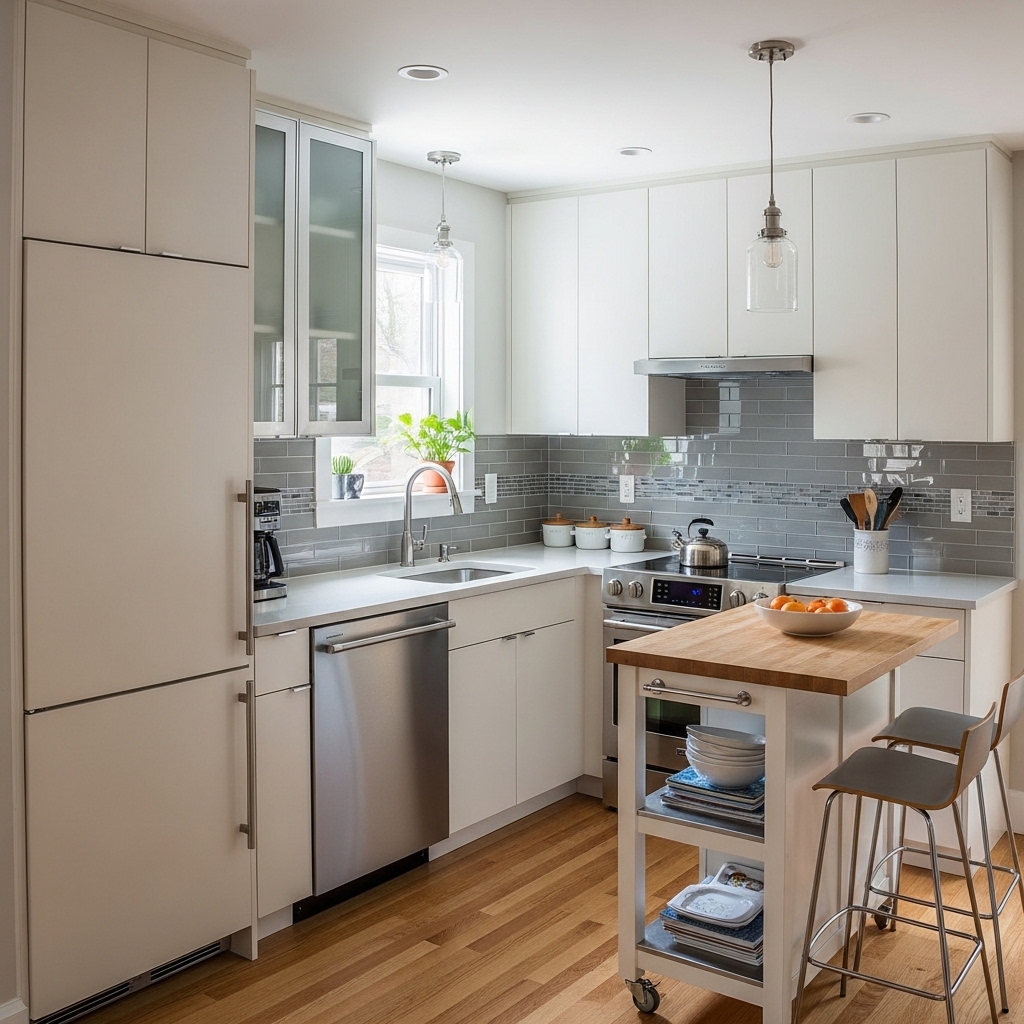
3. Add A Rolling Kitchen Cart For Extra Counter Space

Counter space vanishes the second you set down a coffee maker and a toaster. You wheel in a rolling kitchen cart, and boom – instant prep area that moves wherever you need it. These carts come with shelves or drawers underneath, giving you storage for pots, pans, or pantry overflow. You roll it next to the stove when you’re cooking, push it against the wall when you’re done, or even use it as a makeshift bar cart when friends come over. The flexibility’s unbeatable. You find them at big box stores, vintage shops, or IKEA for every budget imaginable.
Butcher block tops add functionality: You choose a cart with a solid wood surface that doubles as a cutting board, eliminating the need to constantly hunt for space to chop vegetables while something’s already simmering on your four inches of available counter.
Locking wheels prevent disasters: You make sure your cart has at least two wheels that lock in place, because watching your prep station roll away mid-chop or crash into the dishwasher while you’re carrying a hot pan isn’t the kind of excitement you signed up for.
READ MORE: 12 Home Gym Ideas That Make Working Out Easy & Fun (2026)
4. Replace Solid Doors With Glass-Front Cabinets
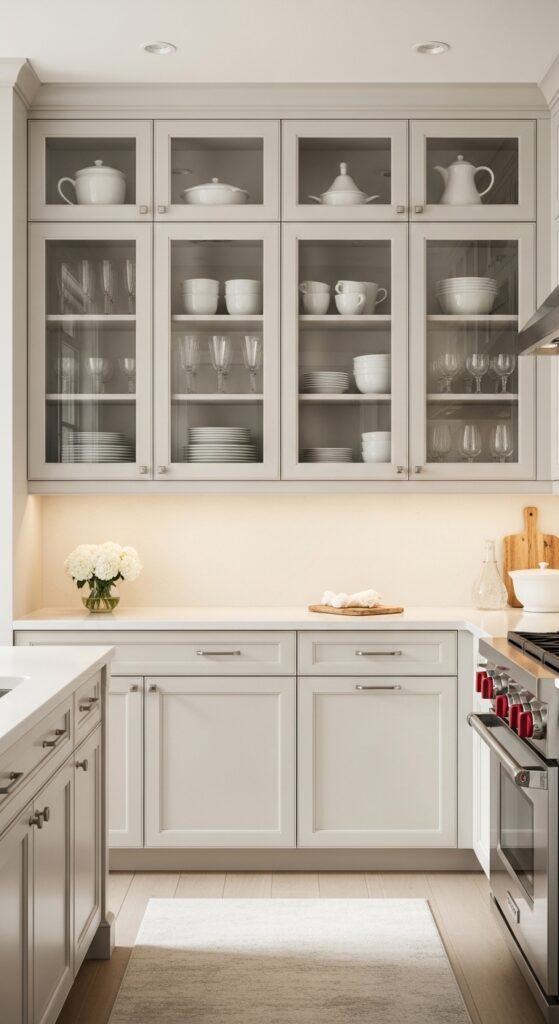
Solid cabinet doors create visual barriers that make your kitchen feel boxed in. You swap just a few upper cabinet doors for glass-front versions, and the whole room opens up. Glass lets your eye travel through the cabinets instead of stopping at a wall of wood or laminate. This trick works especially well on cabinets that face your main living area. You curate what’s visible behind the glass – pretty dishes, matching containers, or colorful cookbooks. The project costs less than a hundred bucks if you DIY it, or you hire someone if power tools aren’t your thing.
Frosted glass hides imperfection: You opt for seeded, frosted, or textured glass instead of clear if your cabinet interiors look rough or your dish collection’s less than photogenic, giving you the open feeling without the pressure to organize like a magazine spread.
Interior lighting takes it further: You stick battery-operated LED strips inside those glass-front cabinets, and suddenly they’re not just storage – they’re actual features that make your kitchen feel custom and expensive on a budget that’s decidedly neither.
READ MORE: 20 Raised Garden Bed Ideas That’ll Transform Your Garden Space 2026
5. Mount A Pegboard Wall For Vertical Storage
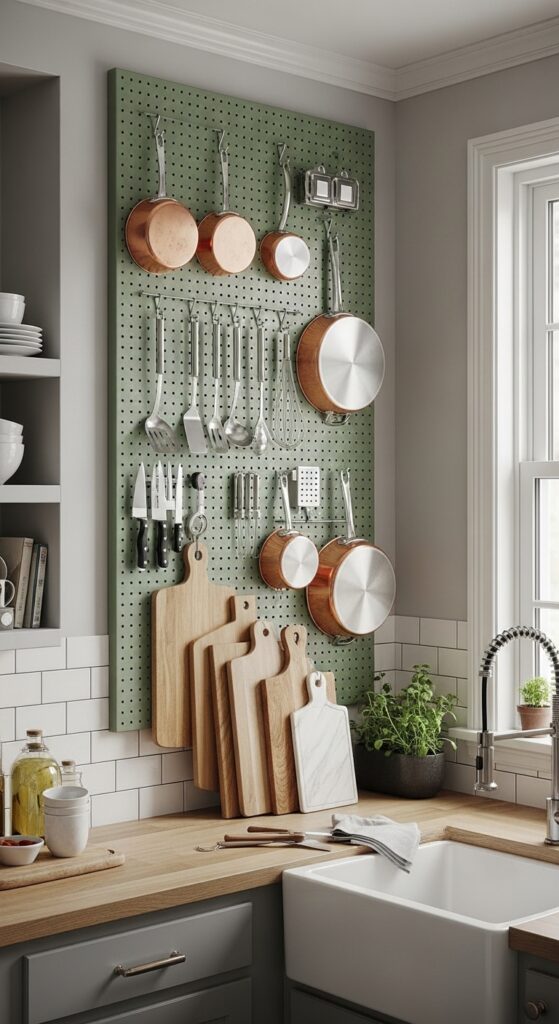
Your pots and pans hog precious cabinet space while your walls sit there doing nothing. You mount a pegboard on an empty wall, and suddenly you’re storing vertically like a genius. Pots, pans, utensils, cutting boards – everything hangs within arm’s reach. The setup looks intentional and stylish (very trendy farmhouse-meets-industrial) instead of cluttered. You customize it completely by moving hooks around as your needs change. Paint the pegboard to match your kitchen or go bold with a contrasting color. The whole setup costs under fifty bucks and takes an afternoon to install.
Frame it for a polished look: You build or buy a simple wood frame around your pegboard’s edges, transforming what could look like a garage workshop situation into an actual design feature that Pinterest would approve of.
Mix pegboard with magnetic strips: You add a magnetic knife strip nearby for your blade collection, creating a compact command center where all your most-used tools live in one organized zone instead of scattered across three different drawers.
READ MORE: 12 Fun Sleepover Ideas for Teenagers They’ll Actually Love 2026
6. Choose Slim Appliances Designed For Small Spaces
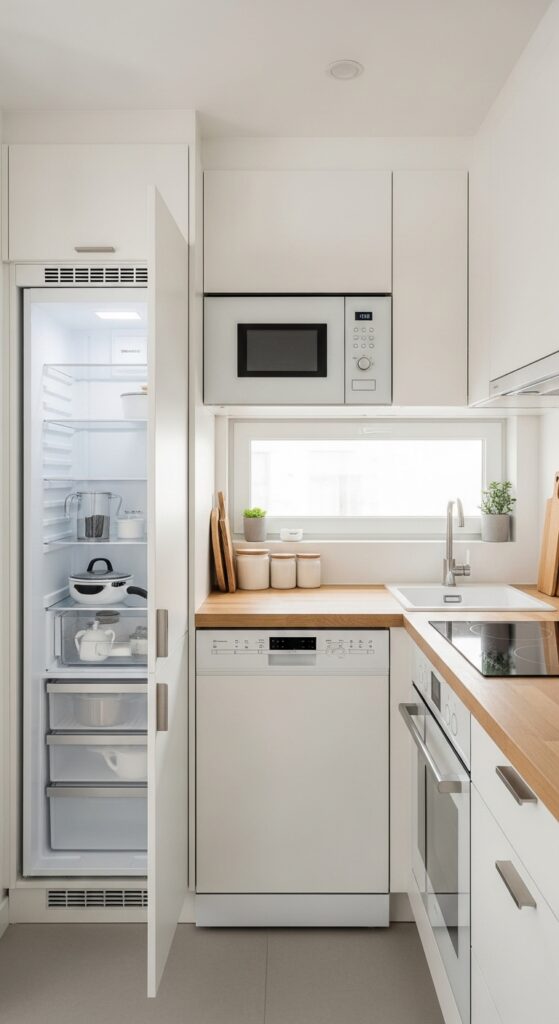
Standard appliances weren’t built with tiny kitchens in mind, and they take up room you simply don’t have. You replace your massive fridge with an apartment-sized model or swap your bulky range for a slim version. These compact appliances perform just as well but shave off precious inches. An 18-inch dishwasher instead of 24 inches? That’s half a foot you just gained. You explore European brands too – they’ve been designing for small spaces way longer than American companies have. Yes, you sacrifice some capacity, but you gain functionality and breathing room where it matters most.
Measure three times before buying: You map out exactly how much space you’re working with, accounting for door swings and clearances, because returning a refrigerator that’s three inches too wide is nobody’s idea of a good time.
Counter-depth models reduce protrusion: You choose appliances that sit flush with your counters instead of jutting out into your walking space, creating cleaner sight lines and preventing that awkward hip-bump dance you do every time you walk past the fridge.
7. Install Under-Cabinet Lighting To Expand Visual Space
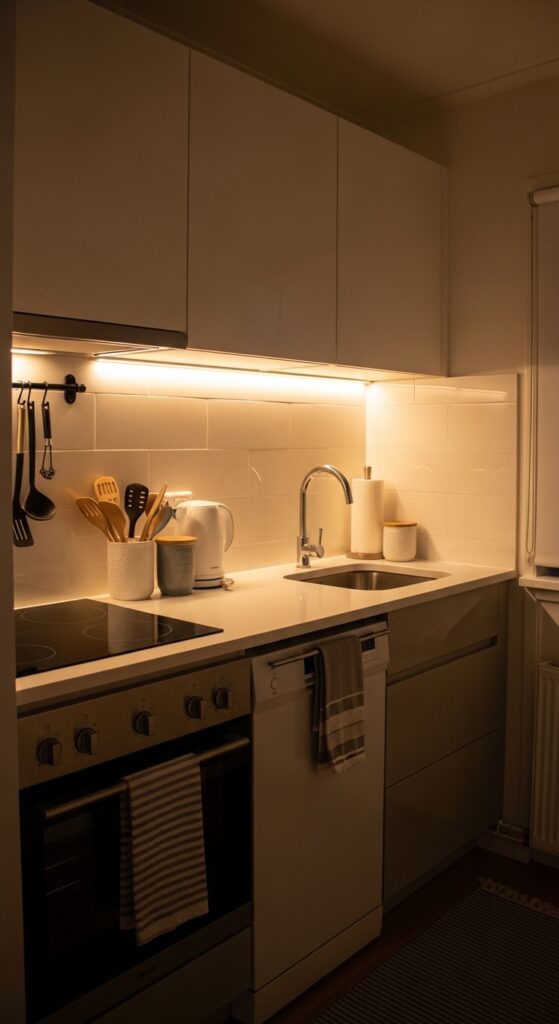
Dark corners make small kitchens feel even smaller and more claustrophobic. You install LED strip lights under your upper cabinets, and the whole room brightens instantly. This lighting illuminates your countertops for actual work while eliminating shadows that eat up visual space. The warm glow makes your kitchen feel welcoming instead of cramped. Under-cabinet lights come in plug-in or hardwired versions, and the plug-in types take minutes to stick up. You control them with remotes, switches, or even your phone with smart versions. Better lighting changes everything.
Warm white beats cool white: You skip the harsh blue-toned LEDs that make your kitchen feel like a hospital operating room and choose warm white (2700-3000K) that creates an inviting atmosphere where people actually want to hang out.
Layer your lighting sources: You combine under-cabinet lights with a pendant over the sink and maybe a small chandelier or flush-mount overhead, because relying on one sad ceiling fixture guarantees your kitchen will always feel flat and uninspiring.
8. Use A Magnetic Spice Rack On Your Fridge Or Wall
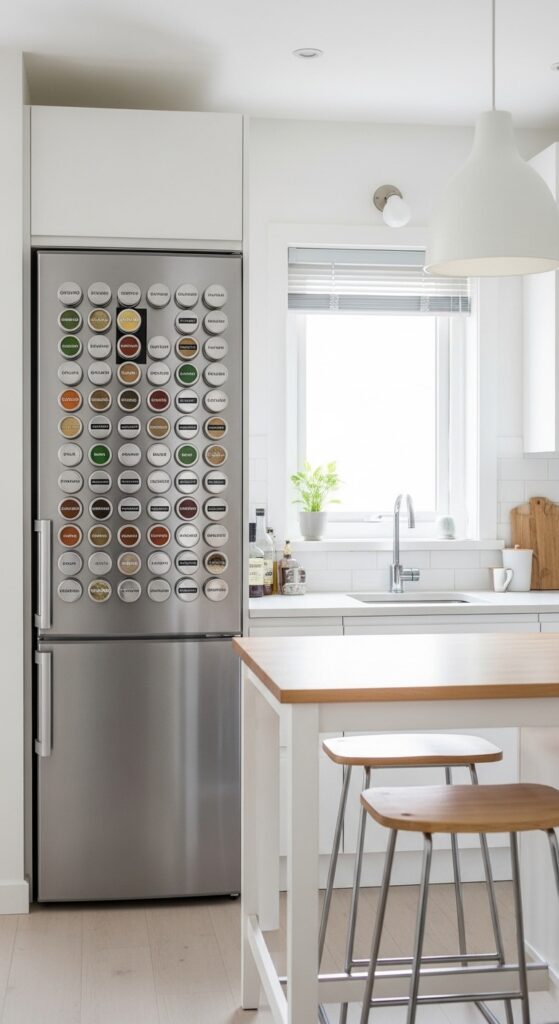
Spice bottles multiply like rabbits and devour drawer space you desperately need for other stuff. You transfer your spices into magnetic containers and stick them directly on your refrigerator side or a metal strip on the wall. Everything’s visible and accessible, which means you actually use that smoked paprika instead of forgetting it exists. The vertical storage frees up an entire drawer or cabinet shelf. You label the tops so you can identify spices at a glance. Magnetic spice storage looks clean and organized – almost like you have your life together. Almost.
Uniform containers look intentional: You commit to one style and size of magnetic tin instead of mixing random containers, because the goal is organized and stylish, not “I raided seventeen different dollar stores for supplies.”
Keep frequently-used spices at eye level: You arrange your magnetic collection by how often you actually cook with each one, putting everyday heroes like garlic powder and black pepper where you can grab them without thinking, while that specialty saffron lives higher up.
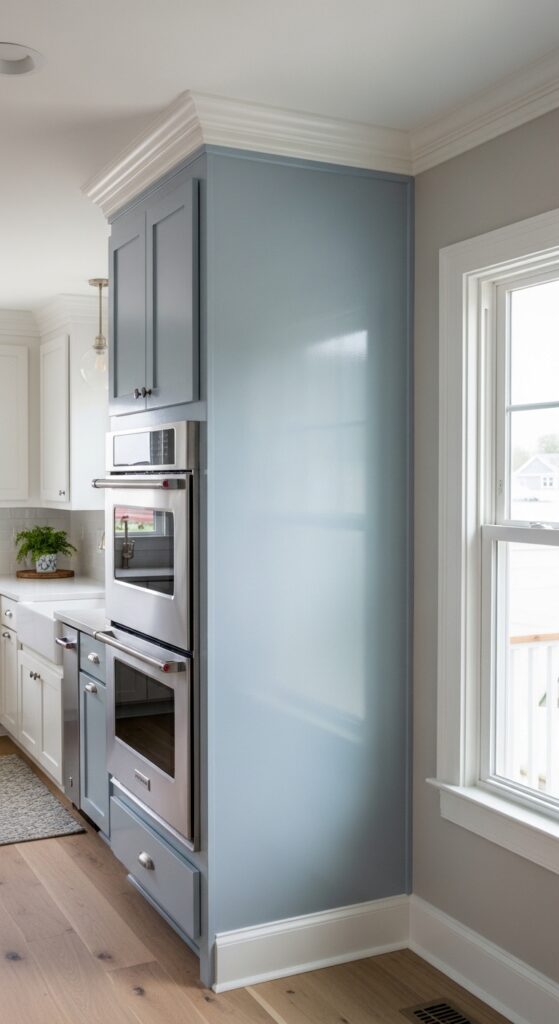
9. Extend Cabinets To The Ceiling
That gap between your cabinet tops and the ceiling collects dust and makes your cabinets look stubby. You add cabinet toppers or build them up to the ceiling, and suddenly your kitchen feels taller and more custom. The extra storage up high works perfectly for items you don’t need daily – holiday dishes, serving platters, or that fondue set. This modification makes builder-grade cabinets look like they were designed specifically for your space. You hire a carpenter or tackle it yourself if you’re handy. The visual impact’s huge because it draws the eye upward instead of letting it stop halfway up the wall.
Crown molding adds the finishing touch: You cap off those ceiling-height cabinets with crown molding that bridges the gap between cabinet and ceiling, creating a seamless look that screams expensive renovation instead of budget DIY project.
Use the tippy-top for rarely-needed items: You store your roasting pan, punch bowl, and Thanksgiving turkey platter in that uppermost cabinet space, because climbing a step stool daily would get old fast but doing it twice a year is totally manageable.
10. Replace Cabinet Doors With Curtains
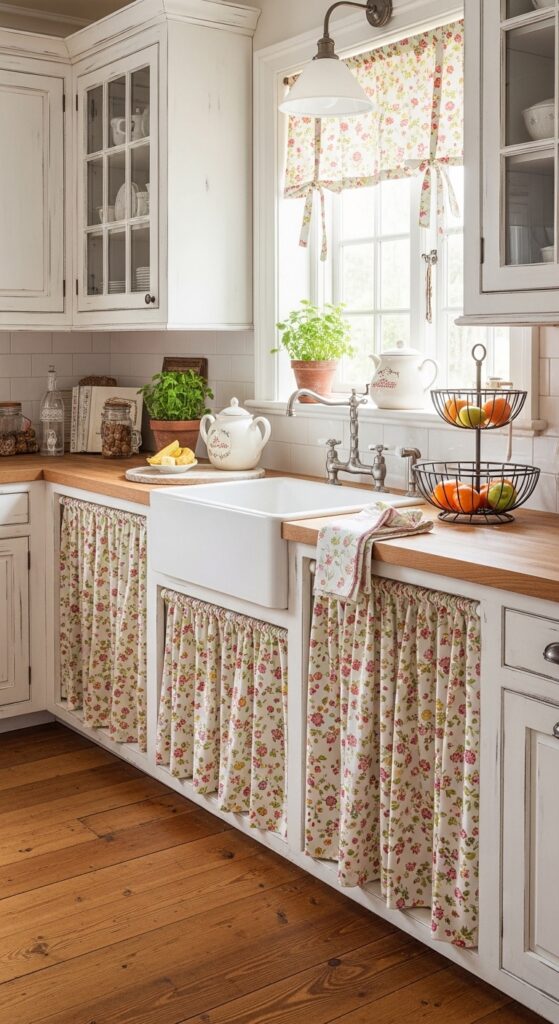
Standard cabinet doors require clearance to swing open, and in a tiny kitchen, that clearance eats up valuable space. You remove lower cabinet doors completely and hang fabric curtains on tension rods instead. Curtains take up zero swing space and add softness to what’s usually a hard-surfaced room. You change the fabric whenever you want a new look – florals for spring, stripes for summer, whatever matches your current vibe. This solution works especially well under the sink where plumbing makes shelves awkward anyway. You hide cleaning supplies behind cheerful fabric instead of beat-up cabinet doors. Cost? About twenty bucks for fabric and rods.
Choose washable fabrics wisely: You skip anything that needs dry cleaning and opt for cotton or linen blends you can throw in the washing machine when they inevitably get splattered with tomato sauce or who knows what else.
Cafe-style curtains work on uppers too: You hang short curtains on the bottom half of glass-front cabinets to hide less-attractive items while keeping pretty dishes visible up top, giving you flexibility without committing to full visibility.
11. Incorporate A Fold-Down Table Or Wall-Mounted Drop Leaf
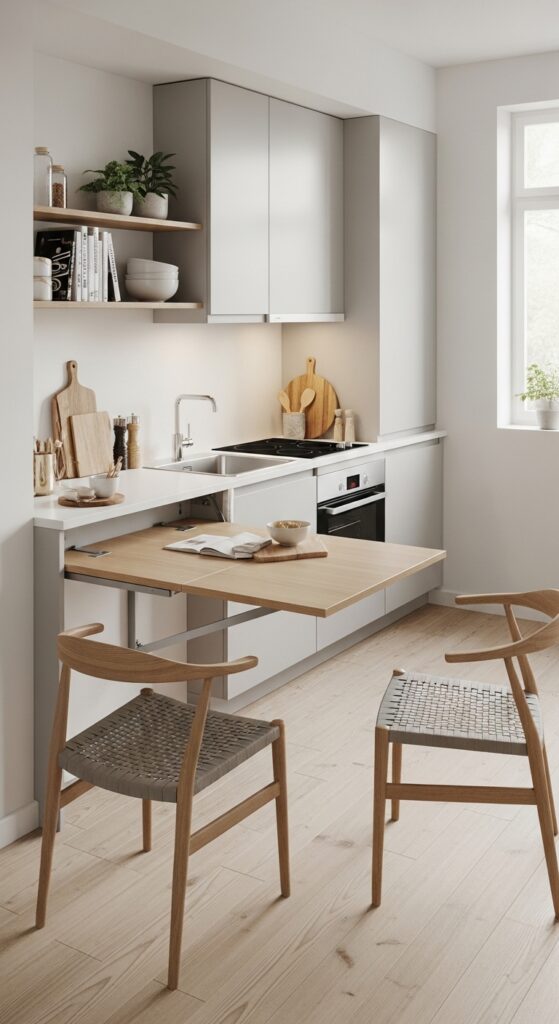
You need a table for eating or extra prep space, but a permanent table dominates your small kitchen. You install a fold-down wall-mounted table that disappears when you’re not using it. These tables come in every style from rustic farmhouse to sleek modern. You mount it to a sturdy wall, fold it up for meals or projects, then tuck it away when you’re done. Some versions include storage underneath or fold out from existing cabinetry. You reclaim your floor space while still having a proper eating area. This setup’s perfect for morning coffee or dinner for two without the table taking over your life permanently.
Mount it at the right height: You measure so the folded-down surface aligns with your counter height for seamless extra workspace, or position it slightly lower if you’re using it primarily as a dining table where standard table height makes more sense.
Add fold-down brackets with support: You invest in quality brackets rated for the weight you’ll actually put on the table, because a fold-down surface that collapses mid-meal or while you’re kneading bread dough is a disaster waiting to happen.
12. Paint An Accent Wall With Reflective Or Light Paint
The wrong paint color shrinks an already-small kitchen even more. You choose one wall (usually the one you see first when entering) and paint it with a high-gloss or semi-gloss light color. The sheen reflects light around the room, making the space feel more open. Glossy paint on an accent wall creates depth and interest without overwhelming a small space. You might go with a pale blue, soft gray, or classic white with a sheen that catches light. This trick costs you one gallon of paint and a few hours. The impact’s immediate and dramatic.
Test samples in different lighting: You paint large swatches directly on the wall and live with them for a few days, checking how they look in morning sunlight versus evening lamplight, because paint that looks perfect at noon might feel totally wrong at dinner time.
Prep your walls properly first: You fill holes, sand rough patches, and prime stained areas before applying that glossy finish, because high-sheen paint highlights every imperfection rather than hiding it like flat paint does – learn from the mistakes of those who came before you.
Conclusion
Your small kitchen doesn’t have to stay stuck in its cramped, chaotic current state. You pick even just three or four of these ideas, and you’ll notice a serious difference in how your kitchen functions and feels. The beauty of these remodels? You tackle them one weekend at a time without emptying your savings account or hiring a full crew. Start with the changes that bug you most – maybe it’s the dark cabinets sucking up all your light, or the lack of counter space making cooking a nightmare. Then build from there. Your tiny kitchen’s about to become the hardest-working, best-looking small space in your home. You’ve got this.
FAQ
-
How much does it cost to remodel a small kitchen?
A small kitchen remodel typically costs between $5,000 and $25,000. Budget-friendly updates like painting cabinets, adding open shelving, and installing new lighting run $5,000-$10,000. Mid-range remodels with new countertops and appliances hit $10,000-$20,000. You save thousands by doing work yourself – painting and shelving are totally DIY-friendly.
-
What is the best layout for a small kitchen?
The galley layout works best – two parallel counters maximize efficiency in tight spaces. L-shaped layouts are your second-best option. Follow the work triangle principle: position your sink, stove, and refrigerator in a triangle with each side between 4-9 feet. Skip islands in tiny kitchens – they block traffic and make spaces feel cramped.
-
How can I make my small kitchen look bigger?
Paint cabinets white or pale gray to reflect light. Replace upper cabinets with open shelving to eliminate visual barriers. Install under-cabinet lighting to brighten surfaces and eliminate shadows. Choose slim, counter-depth appliances. Keep countertops clear – every item sitting out makes your kitchen feel smaller. Use glossy backsplashes to bounce light around.
-
What should I splurge on in a small kitchen remodel?
Splurge on quality lighting first – good under-cabinet LEDs and a statement fixture transform the entire space. Invest in durable quartz countertops that handle daily use. Buy the best faucet you can afford since you’ll use it constantly. Spring for solid wood cabinet boxes if replacing cabinets – they last decades longer than particleboard.
-
Can you remodel a small kitchen yourself?
Absolutely – you can paint cabinets, install open shelving, mount pegboards, add under-cabinet lighting, and replace hardware yourself with basic tools. Rolling carts and magnetic storage require zero installation. Tackle backsplash with peel-and-stick options. Leave plumbing, electrical work, and cabinet installation to professionals unless you’ve got experience.
Pingback: 20 Bathroom Organizer Ideas That Instantly Reduce Clutter - Simple Cozy Home