Author name: Simple Cozy Homes

Under Sink Organizers
Storage Ideas

21 Must-Have Under Sink Organizers for a Tidy Space 2026

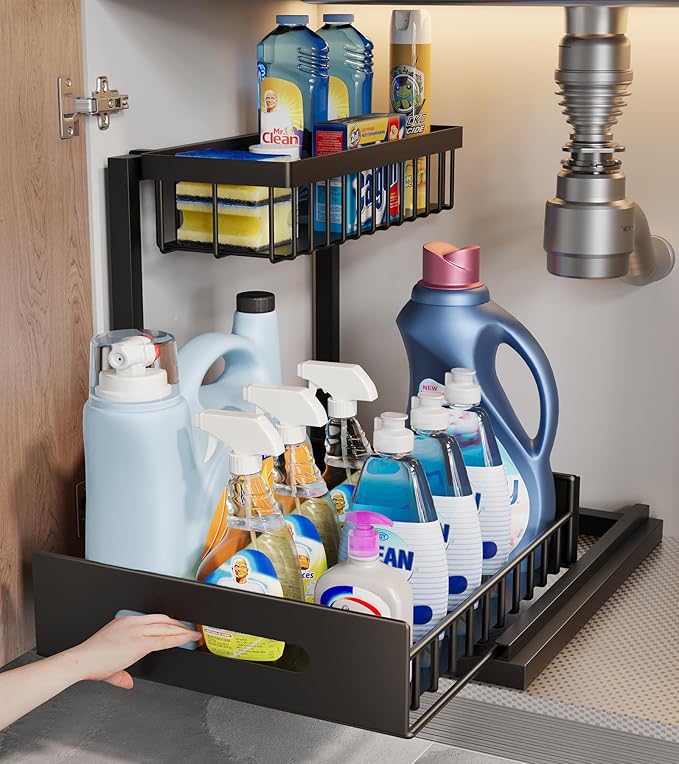
You know that chaotic cabinet under your kitchen or bathroom sink? The one where cleaning supplies tumble out like an avalanche every time you open the door? Yeah, that disaster zone doesn’t have to stay a black hole of lost sponges and mystery bottles. With the right organizers, you can actually see what you own – imagine that. You’ll stop buying duplicate dish soap because you forgot you had three bottles hiding in the back. Smart storage turns wasted space into a functional setup that makes daily tasks smoother. Let’s fix that mess together, one clever organizer at a time, so you can finally reclaim that cabinet. 1. Sliding Drawer Systems Give You Easy Access Two-tier sliding drawers maximize vertical space: These puppies pull out completely so you reach everything without contorting yourself into a pretzel. You stack cleaning supplies on the bottom tier and dish soap, sponges, and scrubbers up top. No more digging behind the pipes to find that bottle of wood polish you bought six months ago. The smooth glide mechanism means even your fully-loaded drawers slide out effortlessly. Deep drawers accommodate tall bottles perfectly: Your jumbo-sized cleaner bottles fit standing upright instead of tipped over and leaking everywhere. You organize by category – glass cleaners together, surface sprays in another section – and suddenly you’re not frantically searching during cleaning day. The drawer sides keep bottles from tipping when you pull the unit out, which saves you from those annoying spills. Read More: https://simplecozyhomes.com/hat-storage-ideas/ 2. Stackable Bins Create Customizable Storage Clear plastic bins let you spot items instantly: You see exactly what’s inside without playing a guessing game or removing every single bin. Label them by category – “bathroom,” “kitchen,” “laundry” – and you’ve got a system that actually makes sense. These bins come in various heights, so you fit them around those pesky pipes that eat up space. Stack two or three high depending on your cabinet depth. Square shapes use space more efficiently than round: Round containers waste precious real estate in corners and along edges. Square bins fit together like Tetris pieces, leaving minimal gaps. You fill your entire cabinet width without awkward empty spots where dust bunnies collect. Plus, you can pull out individual bins without disturbing the whole stack when you need something specific from the back row. Read More: https://simplecozyhomes.com/shoe-storage-ideas/ 3. Over-the-Cabinet-Door Organizers Add Bonus Space Mounted racks hold frequently-used items: Your dish gloves, sponges, and scrub brushes hang right there on the door’s inside panel. You grab them without crouching down or rummaging through anything. These organizers typically feature multiple pockets or hooks – some even include a towel bar at the bottom. The installation takes about thirty seconds with the included hooks that slip over your cabinet door’s top edge. Wire baskets keep spray bottles upright and accessible: Those trigger-spray bottles that always tip over? Now they stand at attention in fitted slots designed specifically for them. You organize by room or purpose, and everything you need lives in one visible spot. The wire construction means drips dry quickly instead of pooling in a solid container, which prevents that gross sticky residue buildup. 4. Lazy Susans Spin Your Supplies Into View Rotating platforms bring back-corner items forward: You spin the turntable and suddenly that furniture polish hiding behind the plumbing materializes. No more dead zones where products go to retire and collect dust. These work brilliantly in corner cabinets where depth makes reaching impossible. One quick rotation and you’ve surveyed your entire inventory without moving a single bottle manually. Multi-tier versions double your storage capacity: Stack two levels on one Lazy Susan and you’ve got cleaning supplies on the bottom, smaller items like sponges and cloths up top. The elevated tier sits on a center post, creating distinct zones that keep categories separated. You’re not mixing bathroom cleaners with kitchen products, which prevents those embarrassing moments when you accidentally grab toilet bowl cleaner for your countertops. 5. Tension Rods Create Vertical Dividers Mount rods horizontally to hang spray bottles: Thread the trigger grips over a tension rod installed front-to-back in your cabinet. Your spray bottles dangle in a neat row, freeing up floor space below for other items. This hack costs about three dollars and takes ten seconds to install. You access each bottle individually without disturbing neighbors, and they drip-dry naturally. Stack rods vertically to corral cutting boards and lids: Run tension rods from top to bottom to create narrow slots. Slide pot lids, baking sheets, or cutting boards into these custom dividers. They stand upright like files instead of stacking flat and creating that annoying avalanche effect. You pull out the one you need without dismantling a precarious tower of kitchen gear. 6. Pull-Out Trash and Recycling Combos Save Floor Space Dual-bin systems separate waste efficiently: One side gets trash, the other handles recycling, and both slide out smoothly when you need them. You’re not tripping over a separate recycling bin sitting on your kitchen floor anymore. These units mount to your cabinet door or base, utilizing space that would otherwise store random cleaning supplies. Most accommodate standard-size trash bags with room to spare. Soft-close mechanisms prevent cabinet-door damage: Ever had someone slam the trash cabinet shut and rattle your whole kitchen? These gliding systems close gently and quietly. You also avoid that jarring crash when the bin swings back after you toss something in. The smooth action means your cabinet doors last longer without loose hinges or scratched paint from repeated impacts. 7. Wire Shelf Risers Double Your Usable Surface Elevated platforms create two storage levels: Place a riser on your cabinet floor and suddenly you’ve got ground-level storage plus a second tier above. Short items like sponge packs and scrubbers fit underneath while taller bottles occupy the top platform. You’ve essentially built a second shelf without drilling holes or permanent installation. These cost less than fancy drawer systems but deliver serious organizational power. Open wire design maintains visibility throughout: Unlike solid shelves that

Raised Garden Bed Ideas
Garden

20 Raised Garden Bed Ideas That’ll Transform Your Garden Space 2026

You know that feeling when you’re squatting in your garden, knees screaming, back aching, wondering why you thought ground-level gardening was a good life choice? Raised garden beds fix that—and so much more. They give you better drainage, warmer soil that wakes up faster in spring, and actual control over what your plants are growing in. No more fighting clay or sand you didn’t ask for. They look intentional, keep weeds manageable, and turn any patch of yard into a proper growing space. Here’s everything you need to know. 1. Cedar Raised Beds for the Long Haul Cedar costs more upfront, but it’s the friend who actually shows up when you need them. This wood naturally resists rot and bugs without chemical treatments, so you’re not wondering what’s leaching into your tomato roots. A cedar bed can last 10-15 years with zero maintenance beyond the occasional dusting off of leaves and existential dread. Why cedar wins over pine: Pine needs treatment to survive more than two seasons, and treated lumber near edibles makes some gardeners twitchy. Cedar weathers to a gorgeous silvery gray that looks expensive without trying. Best height for less bending: Go for 24-30 inches tall if your back has opinions about gardening. You’ll spend more on materials, but your spine will write thank-you notes. Shorter beds work fine if you’re young, optimistic, or very into squats. Read More: 21 Stunning Thanksgiving decor ideas for your home 2. Galvanized Metal Beds That Look Ridiculously Good Metal raised beds showed up and said “we’re here to look sharp and outlast your commitment to sourdough.” Galvanized steel won’t rot, splinter, or host termites, and it brings that modern farmhouse vibe Pinterest dreams are made of. They heat up faster in spring, which cool-climate gardeners love and desert gardeners need to plan around. Round vs. rectangular: Round galvanized beds soften hard landscaping and fit awkwardly shaped spaces like pros. Rectangular ones maximize growing space and line up neatly if you’re into that organized garden look. Watch the afternoon sun: Metal conducts heat, so roots near the edges can cook in blazing sun. Add extra mulch around the perimeter or position beds where they’ll get afternoon shade. Your lettuce will thank you by not bolting in May. Read More: 21 Coastal Christmas Decorations That’ll Make Your Beach House Merry 3. Composite Material Beds for the Zero-Maintenance Crew Composite lumber is recycled plastic and wood fiber having a baby that never rots. These beds cost more than basic wood but require literally zero upkeep—no staining, no sealing, no weekend projects you’ll avoid for three months. They look like wood, act indestructible, and laugh at weather. Color choices matter: Darker composites absorb more heat, which northern gardens appreciate and southern gardens need to consider carefully. Lighter colors stay cooler and often look cleaner longer, though they may show dirt more readily. Weight is your friend: Composite beds are heavy, which sounds annoying until you realize they’re not going anywhere in a storm. No shifting, no gradual sinking into soft ground. Set them once and forget about adjustments forever. Read More: 21 Genius Shoe Storage Ideas for Every Home 4. Stacked Stone Beds That Scream Permanent Garden Goals Stacked stone or concrete block beds are the garden equivalent of getting that tattoo you’ve wanted forever—they’re staying put, so choose your spot wisely. They provide incredible drainage, warm up beautifully in spring, and look like you hired a landscaper even when you absolutely didn’t. Dry-stack vs. mortared: Dry-stacked stone lets you adjust things and provides drainage between blocks. Mortared beds are truly permanent and won’t shift, but they’re harder to modify if you change your mind about that tomato placement. Height planning: Going above 18 inches with stone means considering structural support. Gravity has opinions about tall stone walls. Shorter beds avoid engineering headaches and still give you most benefits, including keeping rabbits confused about entry points. Read More: 21 Clever Garage Storage Ideas for Small Spaces 5. Keyhole Gardens for Maximum Efficiency and Showing Off Keyhole gardens look like someone took a round raised bed and cut a slice for access to a central compost basket that feeds everything. You walk into the center, dump kitchen scraps, and nutrients spread outward while you harvest from all sides. It’s gardening geometry that actually makes sense. Perfect for small spaces: A 6-foot diameter keyhole bed produces shocking amounts of food in minimal square footage. The composting center means you’re constantly feeding the bed without hauling amendments around like some kind of garden packhorse. Build the center right: Use wire mesh or a ventilated plastic basket for the compost core—it needs airflow. Line it with straw or cardboard to keep things from falling through while materials break down and feed your plants dinner. Read More: 21 Hat Storage Ideas That’ll Make Your Home Look Magazine-Worthy 6. Hugelkultur Beds That Use Logs You’d Otherwise Burn Hugelkultur is German for “hill culture” and involves burying logs and branches under your garden bed like you’re creating a wooden sponge that slowly feeds plants. Sounds weird, works beautifully, uses yard waste productively. The wood breaks down over years, holding moisture and releasing nutrients. Start with hardwood logs: Softwoods work but break down faster. Hardwoods like oak create structure that lasts, though they take longer to decompose. Avoid black walnut—it’s juglone content murders tomatoes and other plants without remorse. Layer like lasagna: Logs on the bottom, smaller branches next, then leaves and grass clippings, then compost and soil. The mound settles as wood decomposes, so build it taller than you think necessary. Water less often because buried wood holds moisture like a secret. Read More: 21 Blanket Storage Ideas That’ll Save Your Sanity 7. Corrugated Roofing Panel Beds on a Budget Leftover metal roofing panels make shockingly good raised beds for almost no money. They’re already designed to handle weather, they last forever, and that corrugated texture adds unexpected visual interest. Hardware stores often have dented or discontinued panels on clearance that

Home Decor

21 Stunning Thanksgiving decor ideas for your home 2026

You scroll through Pinterest every November and see those magazine-perfect Thanksgiving spreads, right? The ones that make you wonder if normal humans actually live in those houses. Here’s the truth – you can create that cozy, festive vibe without hiring a professional stylist or spending your grocery budget on pumpkins. Your home deserves some autumn love, and these ideas work for real people with real budgets. Most of these tricks use stuff you already own or can grab at the dollar store. We’re talking simple swaps, quick DIYs, and clever arrangements that look expensive but cost practically nothing. Ready to transform your space into a harvest haven? 1. Layer Your Table Runner with Burlap and Lace You create instant texture by combining two fabric runners instead of using just one boring cloth. This trick adds depth without requiring any sewing skills or fancy materials. The Base Layer Strategy: Start with a burlap runner down the center of your table, letting it hang about six inches over each end. The rough texture gives you that rustic farmhouse vibe everyone loves, and burlap costs next to nothing at craft stores. You can even fray the edges yourself for extra character – just pull a few threads loose and embrace the imperfect look. The Delicate Top Layer: Place a narrower lace runner directly on top of the burlap, offsetting it slightly to show both textures. The contrast between rough and refined creates visual interest that photographs beautifully. White or cream lace works best, but you can try blush pink for something unexpected. Read More: 21 Coastal Christmas Decorations That’ll Make Your Beach House Merry 2. Fill Hurricane Vases with Seasonal Layers Those tall glass cylinders sitting in your cabinet finally get their moment to shine. You build beautiful centerpieces by layering different autumn elements inside these simple containers. The Foundation Trio: Drop dried corn kernels in the bottom third of your hurricane vase, creating a golden base layer. Add cranberries in the middle section for a pop of deep red color. Top it off with mini pumpkins or gourds that sit right at the rim level, and stick a pillar candle in the center. The layers stay separated naturally, and you change them out easily when December rolls around. The Wheat Bundle Option: Fill your hurricane with dried wheat stalks tied with twine, standing upright like a golden bouquet. Tuck in some preserved fall leaves around the edges for color variation. This approach costs about three dollars if you hit the craft store sales, yet it looks like you raided an expensive home goods boutique. Read More: 21 Genius Shoe Storage Ideas for Every Home 3. Create a Gratitude Tree with Branches You turn bare branches into an interactive decoration that gets your guests involved. This centerpiece doubles as a conversation starter and meaningful keepsake. Branch Preparation Basics: Find sturdy branches from your yard – look for ones with interesting shapes and multiple offshoots. Spray paint them gold, copper, or leave them natural depending on your style. Secure them in a weighted vase filled with river rocks or floral foam, making sure they stand stable enough that curious kids won’t knock them over during dinner. The Tag System: Cut leaf-shaped tags from cardstock in autumn colors like burnt orange, mustard yellow, and deep burgundy. Punch holes in them, thread with twine, and scatter them near the tree with markers. Your guests write what they’re grateful for and hang the tags on branches throughout the evening, building a beautiful display of thankfulness that you can photograph and treasure. Read More: 21 Clever Garage Storage Ideas for Small Spaces 4. Stack Vintage Books as Risers Those old hardcovers collecting dust finally earn their keep as functional decor pieces. You create height variation on your surfaces without buying expensive pedestals. The Stacking Technique: Choose books with fall-colored spines – think rust, brown, cream, and forest green. Stack three to five books in descending size order, creating stable platforms at different heights. Place small pumpkins, candles, or floral arrangements on top of each stack, and suddenly your mantel or buffet table has professional-looking dimension. The Title Selection Trick: Face books outward to show off relevant titles or pretty covers that add to your theme. Cookbooks, garden guides, or classics with leather binding work beautifully. You can even wrap some books in kraft paper or fabric tied with twine if the original covers clash with your color scheme. Read More: 21 Hat Storage Ideas That’ll Make Your Home Look Magazine-Worthy 5. Arrange Pumpkins in Unexpected Places Stop limiting your gourds to the front porch – you scatter them throughout your home for maximum impact. Pumpkins cost less than most floral arrangements and last way longer too. The Bathroom Counter Surprise: Place a small white pumpkin next to your soap dispenser with a sprig of eucalyptus. The unexpected location makes guests smile, and it takes literally five seconds to set up. You can use real or faux pumpkins depending on whether you want to cook with them later or store them for next year. The Bookshelf Integration: Tuck mini pumpkins and gourds between books on your shelves, treating them like decorative objects. Mix in some cinnamon-scented pinecones for an autumn smell that doesn’t require plugging in a warmer. This approach spreads the festive feeling throughout your entire space instead of concentrating it in one room. Read More: 21 Blanket Storage Ideas That’ll Save Your Sanity 6. Drape Garland Across Your Mantel You create an instant focal point by swaging greenery across your fireplace. This classic move never goes out of style, and you customize it endlessly. The Eucalyptus Base: String fresh or faux eucalyptus garland across your mantel, letting it drape naturally rather than pulling it tight and straight. The cascading effect looks organic and expensive. Secure it with clear fishing line or small nails pounded into the underside where nobody sees them, and adjust the swags until they please your eye. The Embellishment Layer: Weave in fall

Coastal Christmas Decorations
Home Decor

21 Coastal Christmas Decorations That’ll Make Your Beach House Merry

You love the beach, you love Christmas, and you’re absolutely done with the same old red-and-green routine everyone else drags out every December. Coastal Christmas decorations blend sandy shores with snowy cheer, giving you that breezy, sun-kissed vibe without sacrificing holiday magic. Think weathered driftwood paired with twinkling lights, seashells nestled in garland, and blues that remind you of ocean waves. This style works whether you live steps from the surf or smack in the middle of landlocked suburbia. You create a space that feels fresh, personal, and refreshingly different from your neighbor’s inflatable Santa army. 1. Driftwood Christmas Trees That Skip the Pine Needles Stack Your Way to Rustic Charm: You gather pieces of driftwood in varying lengths and stack them horizontally on a wall or vertically on a base to form a tree shape. The weathered gray tones bring instant coastal character, and you skip the vacuuming of pine needles that haunts you through January. Drill small holes to string lights through the wood, or wrap fairy lights around each piece for a soft glow that feels beachy and festive. Freestanding Sculptures That Double as Art: You arrange driftwood branches in a tall vase or bucket filled with sand to create a three-dimensional tree. Hang small ornaments, starfish, or sand dollars from the branches using thin twine or fishing line. This version works beautifully in tight spaces where a full tree feels like overkill, and you can reuse the driftwood for other coastal projects after the holidays wrap up. Read More: 21 Genius Shoe Storage Ideas for Every Home 2. Seashell Ornaments Straight from Your Beach Walks Paint and Personalize Your Finds: You take those shells you’ve been hoarding in jars and transform them into ornaments with a little metallic paint or glitter. Add a small loop of twine through a drilled hole, and suddenly you’ve got decorations that cost nothing but carry actual memories from your favorite beach trips. White and gold combinations look elegant, while aqua and silver lean more playful and modern. Create Mini Beach Scenes in Clear Baubles: You fill clear glass or plastic ornaments with sand, tiny shells, and maybe a miniature starfish or piece of sea glass. These little beach universes capture the coast in a way that store-bought ornaments never could, and they make fantastic gifts for fellow beach lovers. Seal the top with a ribbon in coastal colors, and you’ve got ornaments that spark conversations every time someone spots them on your tree. Read More: 21 Clever Garage Storage Ideas for Small Spaces 3. Rope-Wrapped Everything for Instant Nautical Vibes Transform Plain Vases and Candle Holders: You grab natural jute rope and hot glue it around glass vases, mason jars, or candlesticks in tight spirals. The texture adds dimension and that unmistakable nautical feel without screaming “I’m trying too hard to be coastal.” Fill the wrapped vessels with white flowers, greenery, or battery-operated candles for centerpieces that work from Thanksgiving straight through New Year’s. Upgrade Your Wreath with Thick Rope Borders: You wrap a grapevine or foam wreath base with chunky rope, securing it with glue as you go. Add shells, starfish, or small ornaments tucked between the rope layers for pops of color and texture. This base works year-round if you swap the decorations seasonally, making it a smart investment for your front door that doesn’t scream “Christmas in July” when you forget to take it down. Read More: 21 Hat Storage Ideas That’ll Make Your Home Look Magazine-Worthy 4. Blue and White Color Schemes That Feel Like Ocean Spray Layer Different Shades for Depth: You mix navy, aqua, sky blue, and crisp white to create a palette that mimics ocean depths and seafoam. This combination feels sophisticated and intentional, not matchy-matchy like those pre-coordinated decorator sets. Use darker blues in larger pieces like throw pillows or table runners, and lighter shades in smaller accents like ornaments or candles. Add Metallic Silver for Sparkle Without Gold Overload: You incorporate silver in your lights, ornament hooks, and ribbon to give your coastal scheme that holiday shimmer. Silver reads cooler than gold, which keeps the beachy vibe intact while still delivering the festive sparkle Christmas demands. Mercury glass votives and silver-dipped pinecones work particularly well as bridge pieces between coastal and traditional holiday styles. Read More: 21 Blanket Storage Ideas That’ll Save Your Sanity 5. Starfish Tree Toppers That Beat Boring Angels Go Large and Dramatic: You crown your tree with an oversized white or natural starfish instead of the traditional star or angel that everyone expects. The five-pointed shape still gives you that star reference Christmas trees demand, but with a coastal twist that makes guests do a double-take. Secure it firmly with wire, because the last thing you need is your statement piece crashing down at 2 a.m. Create a Cluster for Smaller Trees: You wire together three or four medium starfish in different sizes to form a dimensional topper. This approach works beautifully on tabletop trees or narrow trees where a single large starfish might look awkward. Spray paint them white, silver, or leave them natural depending on your color scheme, and you’ve got a custom topper that costs less than those fancy ones at boutique stores. 6. Fishing Net Backdrops for Coastal Photo Ops Drape Netting as Wall Decor: You hang fishing nets across a wall and weave in fairy lights, ornaments, and shells to create a textured backdrop. This setup photographs beautifully for holiday cards or Instagram posts, and it fills large wall spaces without requiring fifty framed prints. The nets come cheap at craft stores, or you can score authentic ones at marine supply shops if you want the real deal. Use Netting as Unconventional Table Runners: You lay fishing net down the center of your dining table and arrange candles, greenery, and coastal ornaments on top. The open weave lets your table surface show through, which adds visual interest without hiding a beautiful wood grain. Plus, cleanup is ridiculously easy – you just

Shoe Storage Ideas
Storage Ideas

21 Genius Shoe Storage Ideas for Every Home

Your shoes deserve better than that sad pile by the front door. You know the one – where your favorite sneakers hide under yesterday’s sandals while your boots topple over like dominoes. Finding matching pairs shouldn’t feel like an archaeological dig through Mount Shoe-More. Good storage transforms chaotic heaps into organized displays that actually make your mornings easier. You’ll protect your investment, maximize your space, and maybe even rediscover those cute flats you forgot you owned. Whether you’re drowning in sneakers or just need somewhere to stash your everyday pairs, these ideas work for real homes with real budgets. 1. Over-the-Door Hanging Organizers Clear pocket organizers show everything at once: You hang these fabric or plastic organizers right over any door and instantly gain vertical storage for 20-plus pairs. Clear pockets let you spot your target shoes in seconds without playing the guessing game. They work brilliantly in closets, bedrooms, or even behind your pantry door if you’re really cramped for space. Slim profile saves precious floor space: These organizers add zero bulk to your room since they use otherwise-wasted door real estate. You keep your floor clear for actual walking – revolutionary concept, right? The pockets hold flats, sneakers, and kid shoes perfectly, though your chunky boots might need a different home. Read More: 21 Clever Garage Storage Ideas for Small Spaces 2. Under-Bed Rolling Storage Bins Low-profile containers slide under any bed frame: You wheel these flat bins right under your bed and suddenly discover storage capacity you didn’t know existed. They protect off-season shoes from dust while keeping them accessible when weather changes. Clear lids help you identify contents without pulling everything out like some desperate treasure hunter. Easy retrieval beats closet floor chaos: You simply roll the bin out when you need those winter boots instead of excavating your closet floor. The wheels make access smooth even on carpet, and you can fit 12-16 pairs depending on shoe size. Just remember what you stored there – out of sight shouldn’t mean out of mind. Read More: 21 Hat Storage Ideas That’ll Make Your Home Look Magazine-Worthy 3. Floating Wall Shelves for Display Storage Open shelving turns shoes into decor elements: You mount simple floating shelves at varying heights and transform your favorite pairs into actual room features. Sneakerheads especially love this approach because it showcases collections like the art they are. Your prettiest heels and unique boots finally get the recognition they deserve instead of hiding in darkness. Adjustable spacing accommodates different heel heights: You control the distance between shelves to fit everything from ballet flats to knee-high boots. This flexibility beats those fixed cubby systems that waste space with one-size-fits-none compartments. Arrange shoes by color or style for that boutique vibe that makes your space feel intentionally designed. Read More: 21 Blanket Storage Ideas That’ll Save Your Sanity 4. Vintage Crates Stacked Horizontally Wooden crates create rustic open storage: You stack wine crates or apple boxes on their sides to build modular shoe cubbies with serious character. Each crate holds multiple pairs while adding that farmhouse-chic aesthetic Pinterest users devour. Sand them down and stain them to match your decor, or leave them weathered for authentic vintage vibes. Rearrange configuration as needs change: You move these crates around whenever your storage needs shift – no permanent installation required. Stack them high for vertical storage or spread them wide along a wall. The open design keeps air circulating around your shoes, which your leather goods will actually appreciate. 5. Tension Rod Shoe Rack Inside Closets Spring-loaded rods hold heels by their actual heels: You install tension rods between closet walls and hang your heels from them like little shoe acrobats. This trick uses vertical dead space while keeping dressy shoes visible and accessible. The angled hang helps heels maintain their shape better than crushing them in boxes. No drilling means renter-friendly installation: You adjust these rods to fit your space perfectly without putting a single hole in your walls. Landlords stay happy, and you get clever storage that moves with you. Install multiple rods at different heights to maximize your closet’s vertical potential. 6. Ladder Shelf Leaning Against Walls Decorative ladder doubles as shoe display: You prop a wooden or metal ladder against your wall and drape shoes over each rung for that effortlessly cool aesthetic. It looks intentional and stylish rather than desperately cluttered. The angled design takes minimal floor space while providing surprising storage capacity. Each rung holds multiple pairs easily: You can fit 3-4 pairs per rung depending on shoe size, giving you storage for 15-20 pairs total. The open design keeps everything visible and prevents that musty smell closed storage sometimes develops. Plus, you can hang bags or scarves from upper rungs for bonus organization. 7. Repurposed Bookcase Shoe Library Old bookcases gain new life as shoe storage: You take any basic bookcase and designate it exclusively for footwear – instant shoe boutique in your bedroom. Adjustable shelves accommodate everything from flip-flops to tall boots. Paint it a fun color or leave it natural depending on your style preferences. Organize by category or color for easy selection: You group similar shoes together or arrange them by color gradient for that satisfying rainbow effect. This organization method cuts your morning routine time because you know exactly where each type lives. Add small bins on shelves for accessories like shoe polish or insoles. 8. PVC Pipe Shoe Holders Cut pipes create custom boot storage: You slice PVC pipes into sections and mount them horizontally to walls for clever boot organization. Each pipe section cradles one boot upright, preventing that annoying slouch that creases leather. This DIY solution costs almost nothing but looks surprisingly polished when painted to match your walls. Keep tall boots standing at attention: You finally stop fighting gravity with those boot shapers that never quite work. The pipes do the heavy lifting, and your boots maintain their shape beautifully. Install them in closets, mudrooms, or even garage spaces where you

Garage Storage Idea
Storage Ideas

21 Clever Garage Storage Ideas for Small Spaces

Your garage probably looks like a tornado hit a hardware store, right? Bikes tangled with garden hoses, mystery boxes stacked to the ceiling, and that one corner where you’re pretty sure something’s living. You’re not alone – most garages become dumping grounds faster than you can say “I’ll organize it later.” But here’s the good news: turning that disaster zone into an actually functional space doesn’t require a magic wand or a mortgage-sized budget. You just need smart storage ideas that work with your stuff, not against it. Ready to reclaim your garage and maybe even park your car in there again? 1. Install Overhead Ceiling Racks for Seasonal Storage Those camping tents and holiday decorations don’t need prime real estate at eye level. You mount overhead racks to your ceiling joists and suddenly gain an entire storage zone you forgot existed. Weight capacity matters: Check that your racks can handle at least 600 pounds – cheaper versions buckle faster than your resolve on January 2nd. You want steel construction with proper ceiling mounting hardware, not flimsy brackets that’ll dump your Christmas lights onto your windshield. Always verify your garage ceiling can support the weight before loading up. Strategic placement wins: Install these racks over your car’s hood or trunk area where you won’t bonk your head daily. Keep the heaviest bins toward the edges near wall support, and label everything so you’re not playing “guess what’s in this box” every season. Transparent bins help too, because future-you will thank present-you for that foresight. Read More: Hat Storage Ideas 2. Build a Wall-Mounted Pegboard System Pegboards turn vertical wall space into customizable storage magic. You hang tools, supplies, and random odds-and-ends right where you can see them instead of buried in drawers. Go bigger than you think: A full 4×8 sheet gives you way more flexibility than those tiny pre-made panels at the hardware store. Paint it a bright color to make tools easier to spot, and outline each tool with a marker so you know exactly where everything belongs. This also reveals immediately when something’s missing – like that hammer your neighbor “borrowed.” Layer your accessories wisely: Mix hooks, baskets, and shelves to accommodate different items. Heavy wrenches need sturdy hooks while spray paint cans sit perfectly in wire baskets pegboard accessories click in and out, so you can rearrange your setup as your storage needs evolve without drilling new holes everywhere. Read More: Blanket Storage Ideas 3. Create Zones with Freestanding Shelving Units Metal shelving units divide your garage into purposeful zones – sports equipment here, gardening there, automotive stuff over there. You stop the everything-everywhere-all-at-once problem that makes garages unusable. Choose adjustable shelves: Fixed-height shelves sound fine until you need to store something two inches taller than your spacing allows. Quality metal units with adjustable brackets let you customize each shelf height. Look for models rated for at least 200 pounds per shelf because garage stuff is surprisingly heavy. Anchor to walls for safety: Freestanding doesn’t mean wobbling precariously when you grab something from the top shelf. Use L-brackets to secure tall units to wall studs. This prevents tip-overs and lets you stack items higher with confidence. Position your heaviest items on lower shelves and lighter bins up top for stability. 4. Hang Bikes Vertically with Wall Hooks Floor-standing bikes trip you constantly and gobble up space. You flip them vertical with simple wall hooks and reclaim approximately 10 square feet per bike. Horizontal versus vertical mounting: Vertical hooks work brilliantly for garages with high ceilings but limited wall length. Horizontal hooks suit longer walls with standard ceiling heights. Either way, mount hooks into wall studs – drywall anchors won’t cut it when your bike weighs 30 pounds and Junior yanks it down enthusiastically. Wheel-first or seat-first positioning: Hanging bikes by their front wheel keeps handlebars from jutting out awkwardly into walkways. Some prefer seat hooks for heavier bikes since the frame supports weight better. Space hooks at least 16 inches apart horizontally so handlebars don’t clash like awkward partygoers. 5. Install Slatwall Panels for Ultimate Flexibility Slatwall transforms plain walls into storage command centers. You slot in hooks, baskets, and shelves anywhere along horizontal grooves, then move them around whenever your whims change. Material quality matters hugely: PVC slatwall resists moisture and won’t warp like MDF versions in humid garages. Yeah, it costs more upfront, but soggy deteriorating walls aren’t the vibe you’re going for. Installation takes a weekend but you’ll use this system for decades. Mix accessories strategically: Combine J-hooks for long-handled tools, wire baskets for balls and small items, and small shelves for spray bottles. The genius lies in rearranging everything without tools – just lift, move, done. Your storage evolves as your hobbies and kids’ interests change through the years. 6. Add Rolling Storage Carts for Flexible Organization Wheeled carts move supplies exactly where you need them, then roll back out of the way. You work on projects without sprinting back and forth for forgotten tools. Heavy-duty casters change everything: Cheap wheels jam, wobble, and generally make you regret your life choices. Invest in locking casters rated for at least 100 pounds per wheel. Two wheels should lock to prevent runaway carts during use. Multi-tier beats single-level: Three-shelf carts pack way more utility into the same floor footprint. Top shelf for frequently-grabbed items, middle for medium supplies, bottom for heavier stuff. Some models include drawers or bins that keep small parts corralled instead of rolling around loose. 7. Mount Fold-Down Workbenches for Space Efficiency Permanent workbenches eat floor space even when you’re not using them. Wall-mounted fold-down versions give you a solid work surface that disappears when finished. Sturdy mounting is non-negotiable: These benches cantilever off the wall supporting significant weight when you’re working. You need to hit at least three wall studs with lag bolts, not wimpy screws. Test capacity gradually before trusting it with your expensive tools. Add integrated storage underneath: Install shelves or cabinets below the bench to maximize

Hat Storage Idea
Storage Ideas

21 Hat Storage Ideas That’ll Make Your Home Look Magazine-Worthy

You bought those gorgeous hats because they make you feel like the main character in your own life story. Now they’re piled on your closet floor or stuffed in a cardboard box, getting crushed and dusty. Your hats deserve better, and honestly, so does your home. Storage doesn’t mean hiding everything away in dark corners – you can display your collection like the art it is while keeping your space organized. These ideas work whether you’re rocking vintage fedoras, baseball caps, or sun hats that could double as UFOs. Some solutions cost almost nothing, while others bring serious style points to your walls and shelves. 1. Wall-Mounted Hat Hooks Create an Instant Gallery Decorative brass hooks turn function into art: You mount individual hooks at varying heights along your entryway or bedroom wall, creating a staggered pattern that looks intentional and chic. The brass finish catches light beautifully, and you get to showcase your favorite hats as décor instead of cramming them somewhere dark. Each hook becomes its own little display moment. Mix hook styles for visual interest: You don’t need matching hooks – grab vintage ceramic knobs from thrift stores, modern geometric designs from home stores, and antique brass pieces from estate sales. The eclectic mix tells a story and gives your wall personality. Your hats hang securely while the varied hooks create texture and depth that flat walls desperately need. Read More: https://simplecozyhomes.com/blanket-storage-ideas/ 2. Over-the-Door Hat Racks Maximize Forgotten Space Clear acrylic organizers keep things visible: You hang a clear over-the-door rack that holds multiple hats without blocking your view or making the back of your door look cluttered. You see every option when you’re getting dressed, which means you’ll actually wear those hats instead of forgetting they exist. The transparent design disappears visually while doing all the heavy lifting. Metal ladder-style racks add industrial charm: You slip a narrow metal ladder rack over your closet door, and suddenly you’ve got six to eight rungs for hat storage. The black or copper finish adds that industrial-chic vibe Pinterest loves, and you can drape scarves between hats for extra organization. Your door becomes a functional statement piece that guests will ask about. 3. Floating Shelves Display Hats Like Museum Pieces Staggered shelf heights create dynamic displays: You install three or four floating shelves at different levels, arranging hats with their brims facing forward like you’re curating a boutique. The varied heights keep your eye moving around the wall, and you can tuck small plants or books between hats for styling. Your collection becomes room décor instead of just storage. Deep shelves accommodate wide-brimmed styles: You choose shelves at least 12 inches deep to handle those dramatic sun hats and floppy beach styles without them tipping over the edge. The extra depth also lets you nestle smaller hats inside larger ones occasionally, maximizing space. Your beach hats finally have a proper home that doesn’t crush their shape. 4. Hatboxes Stack Beautifully While Protecting Your Investment Vintage-inspired boxes add shabby chic charm: You grab floral or striped hatboxes from craft stores and stack them in your closet or on open shelving. They protect your hats from dust while looking intentional and pretty. The boxes themselves become décor elements, and you can label them with cute tags so you know what’s inside without opening everything. Clear acrylic hatboxes showcase special pieces: You invest in see-through circular boxes for your most prized hats – the ones you want to admire even when you’re not wearing them. The clear material keeps dust out while letting you enjoy the structured beauty of a well-made hat. You essentially create a personal hat museum in your closet. 5. Pegboard Systems Offer Customizable Hat Solutions Painted pegboard becomes trendy wall art: You mount a large pegboard sheet, paint it a bold color like navy or blush pink, and insert wooden pegs wherever you need them. The grid pattern looks modern and geometric, while the pegs hold hats securely by their inner bands. You can rearrange pegs anytime your collection grows or changes. Add small shelves between pegs for accessories: You slide tiny pegboard shelves into the holes, creating spots for sunglasses, hat pins, or decorative objects between your hanging hats. The mixed storage keeps everything in one functional zone. Your wall becomes a customized station that adapts to your exact needs instead of forcing you into someone else’s system. 6. Wooden Hat Stands Bring Old-School Elegance Tabletop stands showcase statement hats: You place a carved wooden hat stand on your dresser or entryway table, crowning it with your most beautiful fedora or wide-brim felt hat. The stand elevates the hat to eye level, making it an intentional décor choice. Your favorite piece gets the spotlight it deserves while staying dust-free and shaped perfectly. Freestanding coat racks with hat tiers work double-duty: You invest in a tall wooden coat rack with dedicated hat hooks at the top level, creating a landing zone by your door. You hang coats below and hats above, keeping your outdoor gear organized in one attractive spot. The wood finish warms up your entryway while solving two storage problems simultaneously. 7. Behind-the-Door Crown Molding Shelves Use Dead Space Narrow shelves fit above door frames: You install slim shelves right above your closet door, utilizing that weird space nobody ever thinks about. Baseball caps and beanies fit perfectly up there, and you grab them easily with a quick reach. Your hats stay organized without eating up valuable wall space you need for other things. Paint shelves to match trim for seamless integration: You choose the same color as your existing molding, making the new shelves look like they’ve always been part of your home’s architecture. The cohesive look feels intentional rather than like an afterthought. Your storage solution hides in plain sight while keeping caps accessible and organized. 8. Vintage Ladder Displays Create Rustic Charm Weathered wooden ladders lean against walls beautifully: You prop an old ladder at an angle, draping hats over each rung

Blanket Storage Ideas
Storage Ideas

21 Blanket Storage Ideas That’ll Save Your Sanity

You love blankets – those cozy companions that pile up faster than your Netflix queue. But where do you put them all without turning your living room into a fabric jungle? Your throw blankets deserve better than being stuffed behind the couch or draped over every chair like textile wallpaper. Smart storage keeps your space looking intentional while keeping those warm layers within arm’s reach for spontaneous couch-nesting sessions. These ideas work for tiny apartments and sprawling homes alike, blending function with the kind of style that makes guests ask, “Where’d you get that?” Ready to wrangle those blankets into submission? 1. Ladder Display Station Lean and Mean: Grab a vintage or new wooden ladder and prop it against your wall at an angle. Drape your prettiest blankets over each rung, folding them lengthwise so the textures and colors show off like a cozy art installation. This works brilliantly in living rooms, bedrooms, or that awkward corner you never knew what to do with. You get instant vertical storage that takes up maybe six inches of floor space while adding major visual interest. Style Points: Paint your ladder to match your decor scheme, or leave it raw for rustic charm. The best part? You can rotate blankets seasonally – chunky knits in winter, lightweight linen throws in summer. Switch them out faster than you change your mind about dinner plans, and your room gets a mini makeover every time. Read More: https://simplecozyhomes.com/hat-storage-ideas/ 2. Ottoman with Hidden Storage Double Duty Champion: Storage ottomans are the overachievers of furniture – they give you seating, a footrest, and secret blanket stash all in one piece. Look for ones with removable lids that flip open to reveal surprisingly spacious interiors. You can tuck three to five blankets inside depending on thickness, and nobody knows your organizational genius is happening right under their feet. Place it at the foot of your bed or in front of your sofa. Material Matters: Choose fabric ottomans for softness or leather for easy cleaning. The tufted velvet ones add glamour, while woven options bring texture. Make sure the lid stays attached with hinges – you don’t want to juggle a loose top while holding your coffee and trying to grab that fuzzy throw for movie night. 3. Rolling Cart Organization Mobile Flexibility: Repurpose a bar cart or utility cart as a blanket station that moves wherever you need it. Roll the blankets and stand them upright in the cart tiers, organizing by color or weight. This setup works perfectly in nurseries for easy access to baby blankets or in multipurpose rooms where you shift furniture around. You can wheel it from living room to bedroom to patio without breaking a sweat. Visual Appeal: Metal carts in brass or matte black add industrial chic, while wooden ones soften the look. Keep the top tier for your current favorites and use lower shelves for backups. Add small baskets on one level for throw pillow covers – might as well coordinate your cozy accessories in one mobile headquarters. 4. Decorative Baskets That Actually Work Texture for Days: Large woven baskets bring that casual-elegant vibe while holding multiple blankets in plain sight. Choose natural materials like seagrass, water hyacinth, or rattan that add warmth to any room. The loose weave lets air circulate so blankets don’t get musty, and you can grab what you need without excavating. Tuck one beside your sofa or next to your reading chair for instant accessibility. Size Smart: Go bigger than you think you need – blankets are bulky. A basket that looks huge in the store becomes perfectly proportioned when filled. Look for ones with handles so you can move them around during cleaning sprees or furniture rearranging sessions. Skip tiny decorative baskets that barely hold one throw; they’re cute but useless. 5. Built-In Window Seat Storage Architectural Bonus: Window seats with lift-top storage give you prime blanket real estate while creating a reading nook that would make Pinterest weep with joy. The cushioned top makes a perfect perch for watching rain or reading, and underneath holds your entire blanket collection. You maximize vertical space and turn awkward window areas into functional zones. This works especially well in bay windows or bedroom alcoves. DIY Potential: If you’re handy, build one yourself with storage cubes and a custom cushion. Add hinges to the seat top for easy access, and line the interior with cedar blocks to keep everything fresh. Not handy? Hire a carpenter – this upgrade adds real value to your home while solving your blanket overflow situation permanently. 6. Blanket Ladder with Hooks Upgraded Classic: Take the basic ladder concept and add brass or wooden hooks along the sides for extra hanging power. You get the draped blanket display on the rungs plus individual blankets hanging from hooks, effectively doubling your storage. The hooks also work for scarves, throws, or even string lights for ambient mood. This version packs more organizational punch while maintaining that relaxed, collected-over-time aesthetic. Spacing Strategy: Install hooks between rungs or along the outer rails. Make sure they’re sturdy enough to hold weight without sagging. You can hang blankets by corners or fold them over hooks – experiment to see what looks less “laundry day” and more “styled by a professional.” 7. Credenza Cabinet Storage Closed-Door Policy: Credenzas or console cabinets hide your blankets completely while providing a surface for lamps, photos, or that succulent you swear you’ll remember to water. Fold blankets neatly and stack them inside the cabinet shelves, organizing by season or frequency of use. This keeps dust off your textiles and maintains a cleaner visual line in your space, perfect for minimalist aesthetics. Furniture Multipurpose: Place a credenza behind your sofa for easy access without visible clutter. Use it in your entryway to store blankets for unexpected chilly evenings on the porch. The closed storage means you don’t have to keep everything perfectly folded – shove and shut works just fine for everyday life. Choose credenzas with

Scroll to Top